Hexes Part 2: In Practice
In part 1 of this two-part post, I gave a brief overview of the history of hexes in tabletop wargames. Now I want to share my initial findings in planning my own digital hex board game and some unique hex geometric characteristics. I think you’ll also see why, to a developer, hexes require a bit more thought (and math) than a square grid would.
Before continuing, I want to give a shout-out to two sites that were invaluable to me in getting started. The first is a simple tool Hexagon Calculator which lets you plug in one hexagon geometric value (like height, width, or one side) and it spits out the rest. Although that’s all it does, it saved me a lot of math (read “Googling”) time as I tinkered with grids, in both Affinity Designer and code.
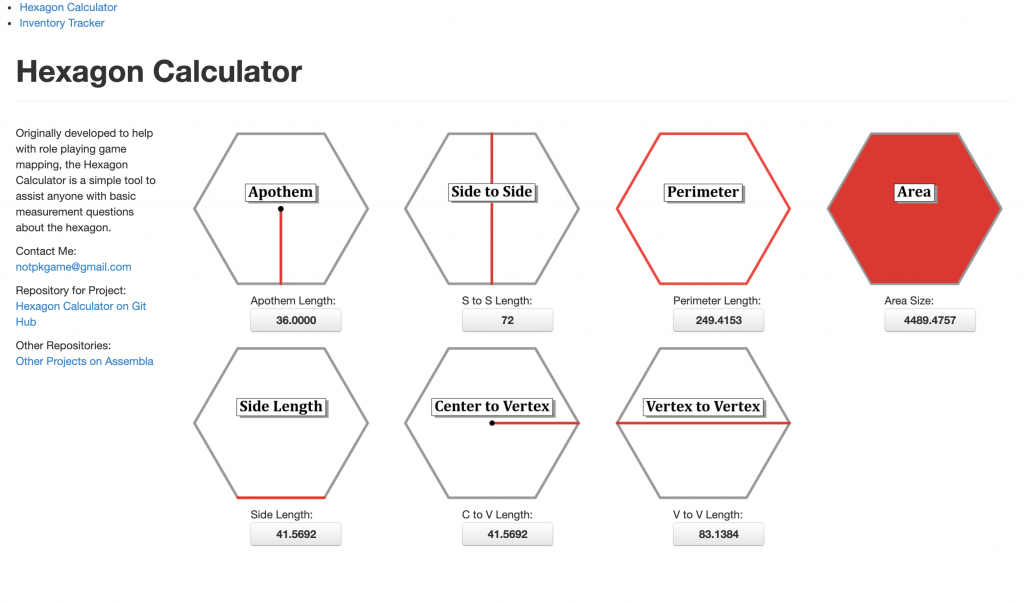
You can see in the Hexagon Calculator screenshot the first problem we’ll encounter in using a hex grid instead of a grid of squares: its height (or side to side) and width (or vertex to vertex) are not equal. Additionally, the length of a single side isn’t equal to either one of them. In a square, its height, width, and the length of one its sides are all equal, which makes things easier coding-wise.
The second page I want to credit is on Red Blob Games’ site and it’s dedicated to the subject of how to code hexes in games. This page is incredible. I discovered it after I had already begun coding my hex grid and had come up with my own more rudimentary system, but this single page has provided so much guidance in so many specific use cases that I kept coming back to it.
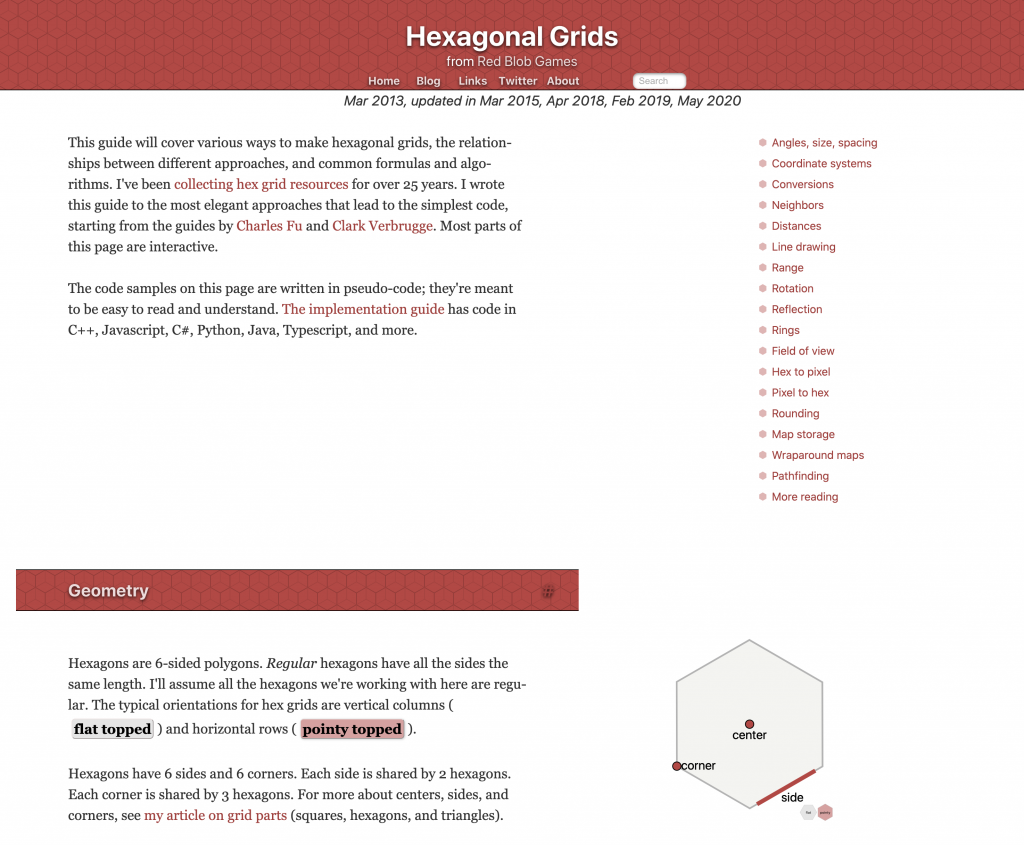
I’m no math expert, but the concepts here are so well-presented and the fact that you can interact with the examples is a godsend. Even if you have slight variations in your own way of doing the math like I did, it’s a huge help in visualizing and understanding what you’re trying to do. You can even click a button to switch from pointed-top to flat-top hex grids and the equations even change to reflect the new orientation. The name of the person who so lovingly put this together is Amit, and I for one owe him at least a beer for his efforts.
So about that difference between flat- and pointed-topped hex grids. That highlights another hurdle I had to overcome in dealing with hexes over squares. The grids themselves aren’t uniform. Take a look at the maps in the two different scenario setups from GMT’s Men of Iron where the hex grid orientations are also different:
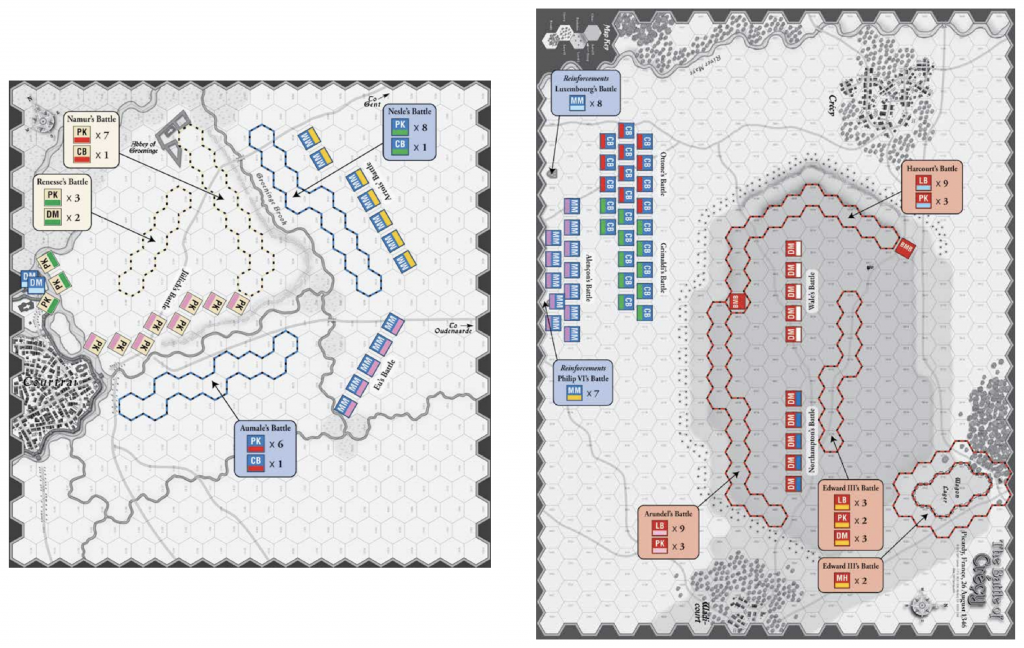
Ignore text and counter orientation, and focus on the tops, bottoms, and sides of the map. You’ll see that in the top row of the Courtrai grid the hexes are pointed whereas with Creçy they’re flat. The grids are perpendicular to each other in a sense. Now focus on the left edge of Courtrai’s map, and notice how the rows go in and out as you move your eyes from top to bottom. Now focus on the left edge on the Creçy map and it looks more uniform all the way down. But looks can be deceiving, and if you look again (and compare to what you might think of as the second “column” of the map) you’ll find there’s still an in-and-out pattern happening but the “in” rows aren’t touching the edge.
Both of those Men of Iron map grids have added hexes to make them look uniform, and most game maps do this. What do I mean by that? A picture is worth a thousand words, so take a look at this one:
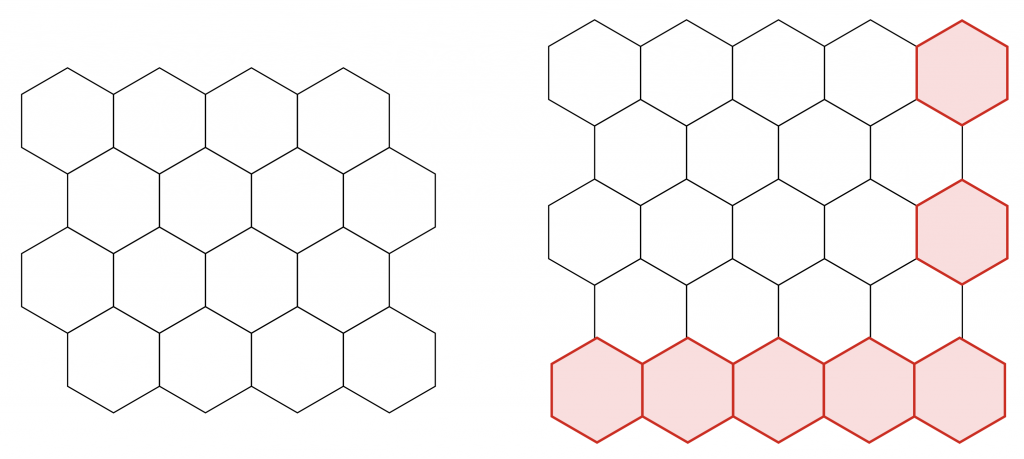
Because we’re not dealing with squares, using a uniform number of hexes for each row and column gives us ragged edges in the overall rectangular game board we’re trying to create. The top and bottom don’t match and neither do our left and right sides. To remedy this, we have to add a row and column (shown in red) to give us a more pleasing rectangular shape. Note that sometimes chunks of unused map are removed after such an adjustment as you can see in the top left of the Creçy map above where they efficiently used some space for a terrain legend.
You might be thinking, like I was, that these hexes are very problematic beasts. That’s partly because we’re trying to “shoehorn” these six-sided shapes into the four-sided game maps that we’re accustomed to and into the “square-centric” rows and columns that come with them. In our case we’re also developing this for rectangular screens. Additionally, I’d say it’s easier to code for rectangles/square grids since we code positioning using a two-dimensional Cartesian coordinate system with good ol’ x and y axes that you used to graph parabolas back in school. A square grid has a natural row-to-x and column-to-y relationship, and switching to a hex grid requires a shift in thinking.
You can see here what happens if we try to map rows and columns onto a hexagon grid:
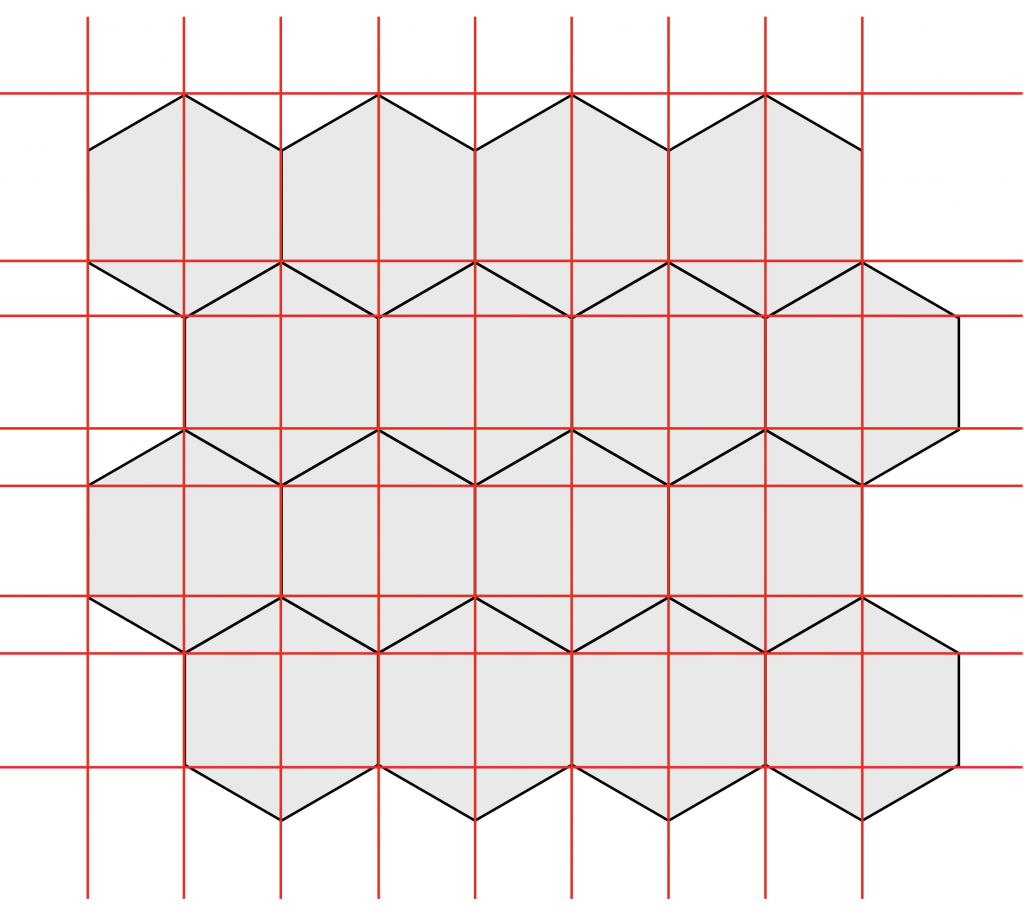
What a mess. As expected, given their non-uniform height and width, they don’t form perfect squares, but rectangles. The bigger issue here, however, is that the rectangular boundaries overlap each other. It’s an issue because most images are saved as rectangles even if they have a transparent background and that rectangle is also their clickable area when plopped into something like a web page. It’s also much easier to code a clickable rectangle or circle within an image in most languages (at least the ones I know), but it takes more development work to check for other shapes. You can find code libraries and interesting math discussions about how to solve this problem without a library online, but I got lucky on this. You may have noticed I said “most images” above and that’s because SVG images are an exception. SVG (Scalable Vector Graphics) is a web-capable image type that uses vector objects (like Adobe Illustrator or Affinity Designer) instead of bitmaps (like Photoshop, JPEG, GIF) so it can be scaled to any size and still look crisp because it’s resolution-independent. Along with that freedom from resolution, the shapes that form an SVG are all individual clickable objects and the click boundary on each object is not a rectangle, but the native shape of the object no matter how complex it is. I had already been leaning toward using SVGs for the crispness mentioned above and this settled it.
These are some of the initial quirks, problems, and curiosities I uncovered as I started down this road of creating and coding a hex-and-counter game. You might already foresee that there will be some others in dealing with the unique geometry of hexes, particularly when dealing with mechanics like line of sight, but we’ll get to those later. Happy gaming!
Both Courtrai and Crecy are examples of linear warfare (pre-modern warfare). Using a hex grid for linear warfare just doesn’t make sense. If your line is facing hexsides, the line is “jagged,” like the left and right sides of the Courtrai map. Some units are more in the front line than others? You also run into big problems defining the front, flanks, and rear of units. If units face a hex corner and have two hex sides as their front, forming a line that faces to the left on the Courtrai map is impossible!
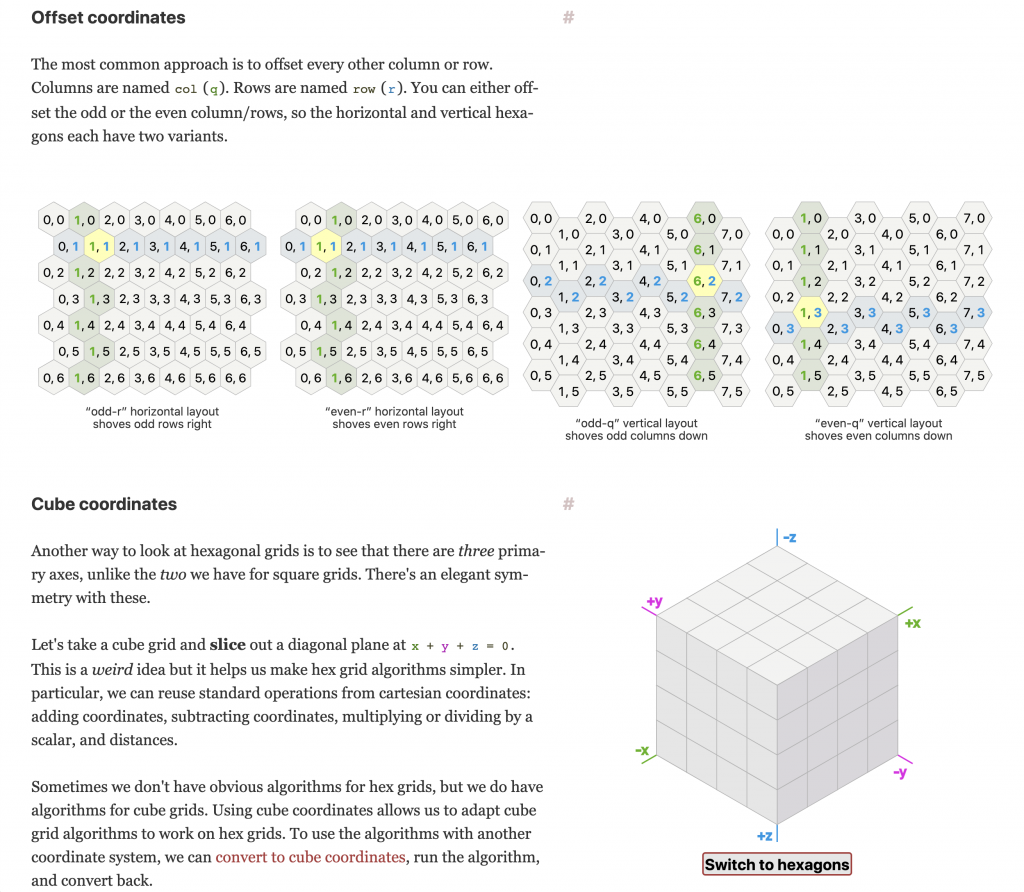
The great oddity of hex grids is the “equidistance dilemma.” Let’s say that a unit is in hex 3,0 on the Odd-r Horizontal Layout map. It wants to move to 3,6. What is the shortest path?
Turns out that there are a whole lot of paths that are exactly the same length. You can dogleg all the way to 1,3 or 4,3 and the distance is exactly the same as if you zig-zagged “directly” down to 3,6. You’d think that placing a defending unit directly between between the starting and ending hexes would block the movement or force the unit to detour, but it really doesn’t. Even with ZOCs, the defender has to choose between 2,3 and 3,3. The moving unit can just dogleg to the opposite side.
This may seem theoretical, especially when you throw in terrain, but it’s surprising important for things like ranged artillery support, as well as in air, naval, and space games.
Great description of how you’ve incorporated hexes within your design. I also fully endorse using Red Blob Games (https://www.redblobgames.com/grids/hexagons/) as a source for these hexagonal mechanics.
As you have described in your post — there is a plethora of wargames based on a hexagonal mapsheet — starting back in the Avalon Hill days, through SPI and many, many others. Still is widely incorporated in commercial wargames marketed today.
Well done!